Week I


Drawing heads
We started Digital Sculpture with learning how to draw heads. The first task was to draw a skull from different angles to get a sense of head proportions.

The second task was to team up into pairs and draw the partners head in full front and in profile. The time limit for the profile was 10 minutes and for the full front 5 minutes. For the third and final task we talked about all the different muscles underneath the skin that define our face and then tried to copy different face shapes that were given on paper. We also drew a bunch of Loomis heads - designed by Andrew Loomis - to get a better understanding of head proportions.


22|09|2017
Week II
Relating to the first week we did a short exercise with Photoshop to highlight a list of muscles in the face.


Sculpting
The second part of the class was focused on modeling a nose with clay. Aiming for realism we got reference pictures and a mirror to look at our own nose while sculpting. I found it quite hard to use our hands only and no tools, but step by step it got more realistic. After a while, I added a ground plate to simulate the beginning of the face and especially of the mouth to improve the overall look.


29|09|2017
Week III
Eye
Sculpting part 2
We continued modelling parts of the face with clay. An Eye, ear and mouth. Today we got a few tools to help shape the difficult bits of the various body parts.


The eye turned out to be the easiest one of the three sculpts today. Creating the eyeball at first helped giving it a better look.
Mouth


The mouth was quite difficult. Blending the end of the mouth into the 'skin' proofed harder than expected. Bending the whole sculpt to make it look more round helped improve the overall look in the end.

Ear
The ear was the most difficult one. Giving it depth and making it stand out from the 'body' was the trickiest part but also the overall shape turned out to be very challenging.


06|10|2017
Week 4
ZBrush
After spending the last few weeks drawing and sculpting clay, today we started with ZBrush, a digital sculpting tool, which we will be using until the rest of the semester. After a short introduction about the interface and the most important brushes, we started to give it a go and model a head.
This video is just a short intro to a few useful things you can do with the Spacebar shortcut, for example change the size or intensity of your brush. Hitting 'X' will enable/disable mirroring.
This video demonstrates the use of a few of the most important brushes in ZBrush. The shortcut to get to brushes is hitting 'B' and then you just use the starting letter of the brush you want to narrow the brushes down. For example: if you want to use the clay brush, you hit 'B' for all brushes and then hitting 'C' for clay will show you all brushes starting with 'C'. Also, holding down 'Alt' while using a brush will invert its function. Holding shift will smoothen your model.
The 6 most common brushes are:
-
Standard Brush
-
Clay Brush
-
ClayBuildUp Brush
-
Move Brush
-
Dan_Standard Brush
-
Polish Brush
Using only the move brush for most of the time, I ended up with this as my head sculpt at the end of the class. It's missing the ears because there wasn't enough time but everything else looks alright for the moment. Although I was skeptical sculpting with actual clay to begin with, it proofed itself very useful. Having created all of the facial features physically with my hands helpt a lot understanding how it should be done in a digital environment.


13|10|2017
Week 5
We spent week 5 working on noses and mouths. After discussing the different techniques to sculpt these body parts and watching a demo of our lecturer we gave it a go and modeled a few faces with just a nose and a mouth. As this exercise was aiming at doing a few different ones instead of working all of the given time on one face and try to make it perfect, all of these models aren't finished pieces.

Attempt 1

Attempt 2

Attempt 3
20|10|2017
Week 6
Eyes
This week we started modeling eyes. After pushing in a dent into your sculpt you can add the eyeball with SubTool --> Append --> Sphere. I struggled mostly with the eyelids and the eye in generall looking properly nested in.

As it was the Halloween weekend, the second part of the class was to sculpt a monster. I decided to go for a dog like creature and I'm particularly happy with how the ears turned out. It still needs to be refined but for the hour we spent on it it's a good start.

27|10|2017
Week 7
Week 7 was study week which means no lectures
Week 8
Texturing
This week we started to texture our objects with the spotlight tool. The video on the left is a demo of how to import a texture and start applying it to the object.
For the first exercise with texturing we used the default head sculpt and downloaded a face texture that would fit from the internet.


As you can see here you can get a pretty good result after a short amount of time, refining it takes a bit longer.


Here you can see the result after taking the time to refine it.
The back of the head obviously isn't finished and the hair of the downloaded texture has a few glitches, but you can get an idea of what's possible with spotlight texturing.
After the texturing, we spent the rest of the time to work on our assignment, which is to create a villain. This is how far I've come so far. I started to create a human-like face of a few reference pictures and want to give it a kind of 'white walker' (Game of Thrones) style. I've only indicated the ears and I might add more forehead/change the shape of the top of the head a bit.


10.11.2017
Week 9
We used week 9 to work on our villain character. I used the time to improve the overall headshape as well as most facial parts (building up the ears from scratch etc.). A really important part was the upper eye part (corrugator). Improving this part helped my model a lot. I also used the time to play around with Fibermesh to create hair/beards. The last part was spent on starting with the typical White Walker face details.
Here is some of the reference material I used. For the nose and ears I used proper human nose/ears as reference, not the While Walker ones.


Turntable of the character so far.
Updated model as I worked at home on it. Added a lot more face detail and worked on the eyes and ears. I also started to shape the upper body.


17.11.2017
Week 10
Quick render to get an impression of how hair would look on the character. I spent a lot of time creating the hair. It is pretty easy to just add some hair but to get exactly the result you're looking takes more time than expected. At this point all that is left to do is to add the final details and texture the character

The first step of texturing was to paint the model in different shades of blue and after that add texture with the Spotlight function in combination with an alpha brush. As I had 2850 history steps I wasn't able to produce a full forward history video of my character. Even only the texturing part would have taken almost an hour, but ZBrush crushed after about 30 minutes. The media file saved luckily, but that's why this is only the forward history of the basic painting.

Closeup look on the texture I used to get a realistic blue skin


Turntable of the finished Character.
I also attempted to do a turntable of the rendered version, but half a turn took 50minutes.

The final results of my rendered character. I'm pretty happy how the texture turned out, because it looked absolutely rubbish when I started texturing. I'm a bit disappointed how the eyeball texture turned out, that's the weakest part of the model I think.


24.11.2017
Week 11
We started looking at our final assignment, which is to model a full character in a pose. In order to model a full human character, we looked first at the proportions of the human body. For example that the average human is ruffly 8 heads tall.
The key landmarks are:
-
2 heads - Chest at nippels
-
3 heads - Belly Button
-
4 heads - Groind
-
6 heads - Below the knee
After that we talked about the most important muscels in the human body and as a exercise highlighted a few of them on an image we had to download.


The second part of class was dedicated to ZBrush. We used the ZSphere tool to create basic human body shapes. As demonstrated in this video it is very simple to create and move this basic shapes. After finishing the shape you can start modeling after pressing 'A' for 'Adapting Mesh' .
Another way of getting a full human body is using the already finished mannequin as demonstrated in this video. You can move the mannequin into a pose and start modeling after pressing 'A' for 'Adapting Mesh'.
01.12.2017
Week 12
Assignment 3 - Full Figure Pose
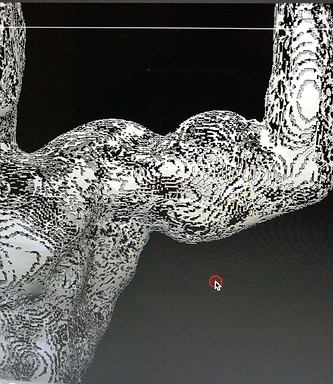
With week 12 we started thinking about our last assignment. The assignment is to develop a full Zbrush character in a dynamic pose. Because we looked at proportion and muscles in earlier classes the focus also is on correct anatomy. A good way to show all that is to model a bodybuilder, that's why I chose Arnold Schwarzenegger as my reference.
As you see in the images on the right I chose a quite difficult pose but I really liked it so I gave it a go. I tried to bring the mannequin in the right position and started modelling. Unfortunately, it turned out to just not look right, the character was to twisted to look believable from certain angles.


I tried to untwist the model by rotating the upper body, but after talking with my lecturer I decided it still wasn't believable enough.
08.12.2017
Week 13
As I didn't want to waste too much time fixing the difficult pose I chose to start again with an easier one. I used this two images as my main reference for the model.


The new pose doesn't look as good as the old one but at least I can focus on the modelling now. Here you can see the main pose I put the mannequin in before I started to model.


I started with working on the legs. The calves turned out to be really difficult and the legs all together with that amount of muscles looked just wrong compared to the rest of the figure.
15.12.2017
Week 14
This is my model after working on the upper body including the back and starting with the arms. I also left the part blank where the pants are going to be.


I tried to form quite simple fists because hands are really difficult.


Here you can see the upper body of my finished model after modeling the head and putting a few veins as details. The face and the hair aren't very detailed but as I intend to give it a marble statue look I think that's ok. I just wanted the face to be recognisable or at least relatable to a young Arnold Schwarzenegger.
During my modelling, I discovered a hole in the left arm and I have no idea how that happened. After trying to fix it with dynamesh one time it didn't close the hole properly so I tried dynamesh again and it then destroyed my model completely. I went a step back and just left the hole as it is pretty small and only visible from above.

Closeup look at the marble texture I used


Unfortunately, the rendered version didn't turn out as I expected somehow.
This is a look at my forward history. It is quite long but it doesn't cover everything because it always kept crashing at a certain point. The video was too big for Vimeo so I uploaded it on YouTube.
And here is a turntable of my finished character. I think the line on his back is from a mask tool I used, but I couldn't get rid of it.
Finished Character


The rendered images are better quality but as I said, it didn't turn out as marble as I intended so I like the not rendered ones where you can see the texture better.


22.12.2017